Android 自定义控件之百分比圆环
前言
最近做一个简单的测试 APP 的时候需要将手机的存储空间使用情况显示出来,刚好看见 360 清理大师的存储空间是以百分比圆环的方式实现的,所以大致模仿了一下它的实现过程。
效果图
首先放上效果图,然后我们再根据效果图进行分析 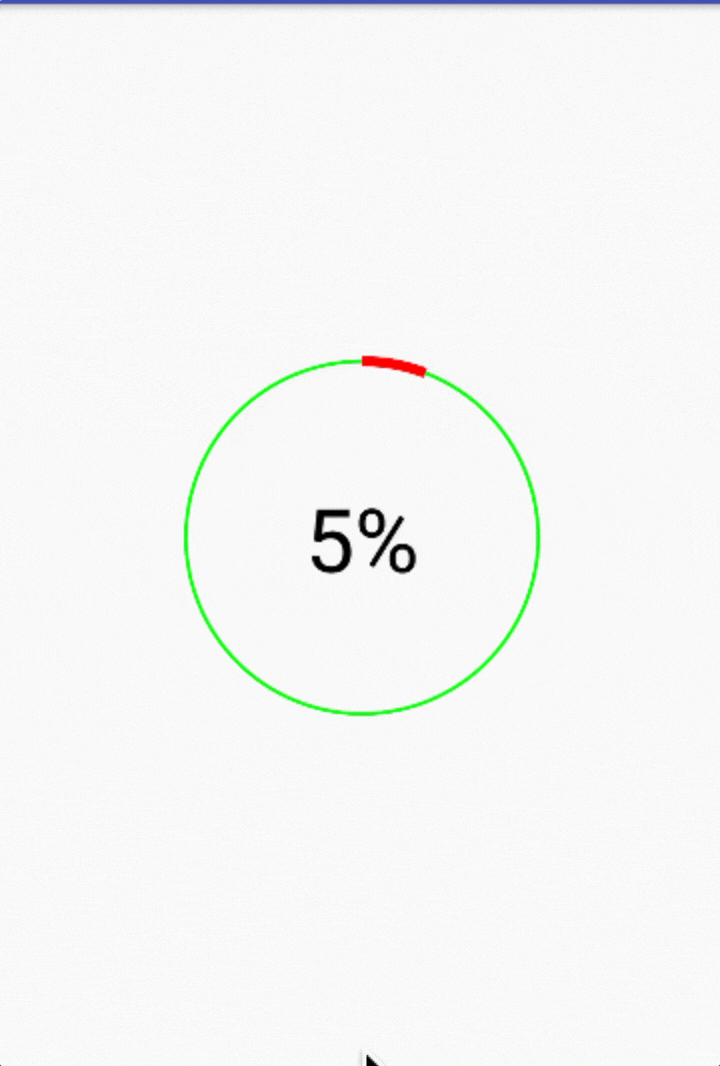
实现思路
从上图我们可以看到,绘制一个这样的百分比圆环主要有涉及到三个元素:
- 背景空心圆:代表着总的进度
- 圆弧:代表着当前进度
- 文字:需要居中,表示具体的进度
在了解到涉及到的元素之后,我们还需要了解绘制各个元素需要哪些参数,由于绘制都通过 onDraw 方法中的 canvas 对象,所以我们可以通过 canvas 对象的方法去确定所需要的参数。
- 绘制圆:查看 drawCircle 可以知道总共需要四个参数:圆心 X、Y 坐标、半径长度以及画笔 Paint;
- 绘制圆弧:查看 drawArc 可以知道总共需要四个参数:Recf、圆弧的起始角度、从起始角度顺时针扫过的角度以及必须的 Paint,这里的 Recf 确定了一个矩形区域,然后确定了一个内接椭圆,而圆弧的绘制实际上是在椭圆上面进行截取;
- 绘制文本:查看 drawText 可以知道,需要四个参数:文本内容、进行绘制的 X、Y 坐标点以及Paint。
实现过程
在了解了绘制元素所需要的参数,这个时候就可以一步步进行绘制了:
首先是绘制圆,这里我们定义了四个参数分别表示圆心 X,Y 的坐标、半径以及绘制所需要的画笔,然后对这些参数进行初始化,最终在 onDraw 进行绘制。
1
2
3
4
5
6
7
8
9
10
11
12
13
14
15
16
17
18
19
20
21
22
23
24
25
26
27
28
29
30
public class RingPercentDemo extends View {
private int mCircleX;
private int mCircleY;
private int mRadius;
private Paint mCirclePaint;
public RingPercentDemo(Context context) {
super(context);
}
public RingPercentDemo(Context context,
AttributeSet attrs) {
super(context, attrs);
mCircleX = 300;
mCircleY = 300;
mRadius = 260;
mCirclePaint = new Paint();
mCirclePaint.setColor(Color.BLUE);
mCirclePaint.setStrokeWidth(10);
mCirclePaint.setStyle(Style.STROKE); //绘制空心圆所以不需要填充
}
protected void onDraw(Canvas canvas) {
super.onDraw(canvas);
canvas.drawCircle(mCircleX, mCircleY, mRadius, mCirclePaint);
}
}接下来是绘制圆环,从效果图上可以看出来,圆环实际上是在圆上截取一段圆弧表示,所以绘制圆环的矩形区域可以确定下来,在确定了矩形区域之后只需要自己设定起始的角度和扫过的角度即可以绘制出在圆上的圆弧。
1
2
3
4
5
6
7
8
9
10
11
12
13
14
15
16
17
18
19
20
21
22
23
24
25
26
27
28
29
30
31
32
33
34
35
36
public class RingPercentDemo extends View {
...
private RectF mRecF;
private float mStartAngle;
private float mSweepAngle;
private Paint mRingPaint;
public RingPercentDemo(Context context) {
super(context);
}
public RingPercentDemo(Context context,
AttributeSet attrs) {
super(context, attrs);
...
mRecF = new RectF(mCircleX - mRadius, mCircleY - mRadius,
mCircleX + mRadius, mCircleY + mRadius);
mStartAngle = -90f;
mSweepAngle = 120f;
mRingPaint = new Paint();
mRingPaint.setColor(Color.RED);
mRingPaint.setStrokeWidth(20);
mRingPaint.setStyle(Style.STROKE);
}
protected void onDraw(Canvas canvas) {
super.onDraw(canvas);
...
canvas.drawArc(mRecF, mStartAngle, mSweepAngle,
false, mRingPaint); //设置为 false 不与中心点进行连接
}
}最后是绘制文本,由于要绘制在圆的中心,所以文本的坐标我们首先设置为圆的中心,然后绘制的风格选为 Align.CENTER,这样文本将以设定的坐标点向两边延伸保证了 X 处于中心位置。
实际效果图:1
2
3
4
5
6
7
8
9
10
11
12
13
14
15
16
17
18
19
20
21
22
23
24
25
26
27
28
29
30
31
32
33
34
35
36public class RingPercentDemo extends View {
...
private int mTextX;
private int mTextY;
private Paint mTextPaint;
private String mTextStr;
public RingPercentDemo(Context context) {
super(context);
}
public RingPercentDemo(Context context,
AttributeSet attrs) {
super(context, attrs);
...
mTextPaint = new Paint();
mTextPaint.setColor(Color.BLACK);
mTextPaint.setStyle(Style.FILL);
mTextPaint.setTextSize(40);
mTextPaint.setTextAlign(Align.CENTER);
mTextPaint.setTextSize(mRadius / 2);
mTextX = mCircleX;
mTextY = mCircleY;
mTextStr = "33%";
}
protected void onDraw(Canvas canvas) {
super.onDraw(canvas);
...
canvas.drawText(mTextStr, mTextX, mTextY, mTextPaint);
}
} 这个时候我们能够发现文本实质上不在中心位置,这是为什么呢?因为我们在设定的坐标是用于确定绘制的基准线而不是绘制的中心点,所以自然文本不可能绘制在正中心,具体可以借用下图来进行描述:
  从这就可以很明显的看到,文本的中心和设定的坐标之间是存在一个偏移量的,所以为了使文本处于真正的中心,我们需要计算得到这个偏移量,然后将之前设定的基准线下移。在计算偏移量之前首先需要了解字体是如何进行测量的,具体如下图所示:
  其中 Top 表示基准线以上可绘制的最大距离(负数),Bottom 表示基准线以下可绘制的最大距离(正数),Ascent 表示基准线以上推荐的可绘制的距离,Descent 表示基准线以下推荐的可绘制的距离。 了解完这一切之后如何计算偏移量就很简单了,通过 FontMetrics 获取 Bottom 和 Top,然后通过 ((Bottom - Top) / 2) - Bottom 最终取得偏移量。代码做如下修改:
1 | public class RingPercentDemo extends View { |
修改之后的效果: 
改进
自定义属性
经过上述过程,虽然圆环百分比的效果已经实现,但是跟效果图中的还是差的很远,而且也不能够灵活,所以我们需要借助自定义属性去改进我们的圆环。
首先需要在 values 文件夹下创建 attrs.xml 文件在里面声明我们需要定义的属性:
1
2
3
4
5
6
7
8
9
10
11
12
13
14
<resources>
<declare-styleable name="RingPercentDemo">
<attr format="integer" name="radius" />
<attr format="color" name="circleColor" />
<attr format="integer" name="circleStrokeWidth" />
<attr format="integer" name="circleStyle" />
<attr format="color" name="ringColor" />
<attr format="integer" name="ringStrokeWidth" />
<attr format="integer" name="startAngle" />
<attr format="integer" name="sweepAngle" />
<attr format="integer" name="rate" />
</declare-styleable>
</resources>然后在构造函数获取到自定义的属性的属性值
1
2
3
4
5
6
7
8
9
10
11
12
13
14
15
16
17
18
19
20
21
22
23
24
25
26
27
28public RingPercentDemo(Context context,
AttributeSet attrs) {
super(context, attrs);
TypedArray typedArray = context.obtainStyledAttributes(
attrs, R.styleable.RingPercentDemo);
mRadius = typedArray.getInteger(R.styleable.RingPercentDemo_radius, 60);
mCircleColor = typedArray.getColor(
R.styleable.RingPercentDemo_circleColor, Color.GREEN);
mCircleStrokeWidth = typedArray.getInteger(
R.styleable.RingPercentDemo_circleStrokeWidth, 5);
mCircleStyle = typedArray.getInteger(
R.styleable.RingPercentDemo_circleStyle, 0);
mRingColor = typedArray.getColor(
R.styleable.RingPercentDemo_ringColor, Color.RED);
mRingStrokeWidth = typedArray.getColor(
R.styleable.RingPercentDemo_ringStrokeWidth, 10);
mStartAngle = typedArray.getInteger(
R.styleable.RingPercentDemo_startAngle, -90);
mSweepAngle = typedArray.getInteger(
R.styleable.RingPercentDemo_sweepAngle, 90);
mRate = typedArray.getInteger(R.styleable.RingPercentDemo_rate, 100);
typedArray.recycle();
init();
}在获取到这些属性值之后只需要给对应的 Paint 和变量设置对应的值即可。
固定圆心和动态变化
圆心的位置我们希望能够一直处于 View 的中心,所以需要重写 onMeasure 方法,在 onMeasure 方法通过获取 View 的高度和宽度得到了 View 的中心点坐标,从而使得圆心一直在 View 的中心。
1
2
3
4
5
6
7
8
9
10
11
12
13
14
15
16
17
18
19
20
21
22
23
24
protected void onMeasure(int widthMeasureSpec, int heightMeasureSpec) {
setMeasuredDimension(measuse(widthMeasureSpec), measuse(heightMeasureSpec));
mCircleX = getMeasuredWidth() / 2;
mCircleY = getMeasuredHeight() / 2;
//判断设定的圆是否超出显示范围,如果超出需要缩小
if (mCircleX < mRadius) {
mRadius = mCircleX - mCircleStrokeWidth - mRingStrokeWidth;
mTextPaint.setTextSize(mRadius / 2);
} else if (mCircleY < mRadius) {
mRadius = mCircleY - mCircleStrokeWidth - mRingStrokeWidth;
mTextPaint.setTextSize(mRadius / 2);
}
FontMetrics fontMetrics = mTextPaint.getFontMetrics();
int offsetY = (int) (((fontMetrics.bottom - fontMetrics.top)) / 2 - fontMetrics.bottom);
mTextX = mCircleX;
mTextY = mCircleY + offsetY;
mRecF = new RectF(mCircleX - mRadius, mCircleY - mRadius,
mCircleX + mRadius, mCircleY + mRadius);
}在解决了圆心的问题之后,还需要为圆弧提供动态变化的效果,这里可以通过不断重绘达成目标。
1
2
3
4
5
6
7
8
9
10
11
12
13
14
protected void onDraw(Canvas canvas) {
super.onDraw(canvas);
canvas.drawCircle(mCircleX, mCircleY, mRadius, mCirclePaint);
canvas.drawArc(mRecF, mStartAngle, mCurrentAngle, false, mRingPaint);
canvas.drawText(mTextStr, mTextX, mTextY, mTextPaint);
if (mCurrentAngle < mSweepAngle) {
mCurrentAngle += 3.6;
mTextStr = mCurrentAngle * 100 / 360 + "%";
postInvalidateDelayed(mRate);
}
}
相关测试工程
总结
涉及到 View 的绘制需要对元素进行拆分,然后进行单独处理,这样思路会比较清晰
Thanks
- android canvas drawText()文字居中
- Android自定义控件之百分比圆环进度条